Indigenize!

Rekindle Your Wild Joy and Deep Belonging to the Earth

Packrattiness January 25, 2011

Filed under: Do-It-Yourself,Spiritual Ecopsychology — BrujaHa @ 8:13 pm
Tags: , , , , ,

What is optimal packrattiness?

How much should we keep ‘just in case,’ like farmers and ranchers do, old rolls of barbed wire and bits of cloth and car parts and bread twisty-ties that might indeed come in handy some day? And how much is just junk, unnecessarily sucking up our life-energy with the need to dust and organize and find again in the piles? Then if we can manage to get it out of our immediate space, what to do with it – get rid of it altogether (thus virtually ensuring the need for it the very next day) or store it interminably? I’m haunted by the words of simplification guru Brooks Palmer, who calls storage rentals “clutter alimony.”

Well, I want to report that I feel inordinately pleased with my level of packrattiness this week. And it’s led to a tip that might come in handy for you too.

I’ve been cleaning house. My downfall is books. I took out 10 full boxes from my 470-sq-ft cottage; can you believe it?! I look at the shelves and the weird thing is, they are still full. So where had those 10 boxes full been???

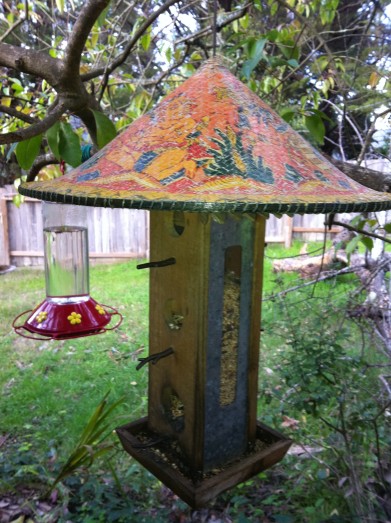
Some things are hard to let go of. For example, the hat that I wore while traveling in Bali and then hand-carried on the planes and buses and shuttles and by foot all the way home. It’s very cool – triangular in shape, cleverly made of several layers of perfectly cut palm thatch, edged with spiral wire, and lavishly painted with Balinese deities.  And I’ve had it for ten years, rarely wearing it because let’s face it, how often does one work in rice paddies in northern California? But it is too beat up to donate, and how can one throw such a thing away?

Well, I was about to. This week.  In fact, I even got it into the outside garbage can.

Then inspiration struck. I hauled it back out again: I knew what to use it for.

My intention was for the hat to protect the birdseed from getting wet and soggy when it rains, as the existing feeder’s roof is woefully inadequate for that task. The Balinese topper also seems to have the nice unintended side effect of preventing easy squirrel access.

It was hard to let the hat go. I found it far more satisfying to find a new use for it, even one that involved taking a knife to it and further, virtually ensures its gradual decay. But that’s better than unceremoniously dumping it into the trash. It seemed insulting to throw it out. Now it will have a noble death in the service of its intended purpose, albeit for birds instead of people. I doubt the fronds will care which species it serves.

So this is my new packrattitude:  either (1) give the stuff you’re not using to someone who will, or (2) keep it till you can think of some weird new use for it, then let it go to that.
 

DIY Scented Gift Bow made of Repurposed Perfume Ads November 8, 2010

Filed under: Arts,Do-It-Yourself — BrujaHa @ 12:34 am
Tags: , , , , , , , ,

For topping off the wrapping of a very special gift, make a one-of-a-kind bow with the added surprise of carrying an exotic designer scent!

Your recipient need never know that this lovely and festive gift bow was made out of junk ads  — unless, of course, you want to gain big repurposing DIY cred by revealing this.

Materials needed:  One fold-out paper perfume sampler advertising insert (the kind you rub on your wrist).

Tools needed:  Scissors and a bit of scotch tape.

*

Step 1:

Locate smelly perfume inserts in magazines or newspaper ads

The Sunday newspaper, especially around holidays, carries several pounds of glossy advertising inserts. Many of the department store flyers contain inserts for designer perfumes, the sort containing a scent sample you can unfold and rub on your wrist. These scented ads can be found in womens’ fashion magazines as well.

*

*

Choose one of these inserts, preferably one with a strong yet pleasant aroma. (Or pick a particularly stinky ad if intended for a disliked co-worker whose name you drew in the office pool.)

*

*

*

Step 2:

Fold and Artfully Shred the Ad

Fold the ad in half lengthwise.

*

*

*

Then take out long scissors. Leaving the perfumed part folded inside on one of the free ends, make thin parallel cuts along the folded side – about 1/4 inch wide at most. Stop about 1/3 inch away from the fold. This will give you one piece of paper with long shredded strips and a margin along the top.

*

*

*

Step 3:

Roll it up and tape it closed

After the length of the ad has been given its cut, take the solid end and begin to roll the strip up. Roll it fairly tightly, allowing the shredded parts to stick out rather like flower petals or fireworks.

*

*

*

After the roll is complete, ensure it will not unroll again by holding it shut with a small piece of scotch tape.

*

*

Step 4:

Voila! Affix to a special gift.

Fluff it up a bit on top.

Some of the shorter perfumed bits may emerge from the longer loops; this is okay and even gives it a bit of zing. Arrange these unruly pieces in an artistic fashion.

*

*

Flatten the taped bottom, and use that as a base to tape it onto your wrapped gift.

Voila!

*

*

Give to the recipient.

Once they notice the nice aroma, watch them delight in your creativity.

(Or watch them recoil in horror, depending upon recipient and perfume ad of choice.)

*

This DIY recycled art project is also a featured Instructable.

*


DIY Envelopes from Junk Paper April 2, 2010

Never buy an envelope again!

Wow your friends and bill collectors with mail in these envelopes you’ve made out of repurposed junk paper.  This envelope looks like the sort you’d purchase, with angled bits in the back.

Check it out & try it.  It’s easy to make. You can make someone happy, extend the use of those bodies of trees, & reduce the landfill all in one fell swoop.

Here’s how:

*

*

Materials Collection

Sources for free and fabulous “junk” paper are everywhere: junk mail, NYT Magazine, gorgeous catalogs for things you can’t afford, old calendars, discarded books.

Begin collecting as soon as you can because packrat-ism is a positive thing in this case! Whatever you don’t use can come in handy for collages and other projects.

Here you see an excellent source for gathering raw materials.

*

Last year's calendars: Score!!

*

For envelopes, you’ll want paper at least 8-1/2 x 11″, and bigger is better. In addition, if you plan to send it through the postal service, the paper should have a heavy thickness to it, enough that it won’t rip or come apart with rough handling.

You will also need scissors and scotch tape.

And in the final step, you will want a Sharpie pen, or white paper to tape onto your envelope, for addressing purposes.

*

Image Selection & Initial Folds

For the complex envelope, the bigger the paper, the better. Old calendar pages are ideal.  I also like heavy maps and coffee-table book dust jackets.

*

*

Begin by folding your chosen image on the diagonal.

The first fold will create the bottom of your envelope’s front.

You’ll want to fold over more than you might think, in order to make the envelope wide enough to hold most paper or cards.

*

first fold, creating the bottom of the envelope's front

front view of first fold

back view of the first fold

back view of first fold

*

Fold in the sides

Fold each side angle in to the middle, over the bottom fold you just made.

Details: The edges should overlap. Make sure you have enough paper on each side to cover up the envelope’s future contents. A common mistake is to make one side too short, as the side bits are uneven at this point.

Then, as in origami, unfold it and reverse-fold each of the bottom corners. This makes it look more like an envelope, with the middle fold now on top.

*

folding in the sides over the bottom fold

Folding in the sides over the bottom fold

*

After folding, open the sides up and fold them in first with the bottom then folded in after.

This is like a reverse fold in origami.

*

How the back looks after reverse- folding

How the back looks after reverse- folding

*

Complete the shape, tape it down, and trim it

Now fold over the point that’s sticking up off the bottom piece. It will look squared-off.

Fold it up and make its top match the side bits in an aesthetically-pleasing way.  You can give it an interesting angle if you like, or if its odd shape happens to fit the way you folded the sides. (That’s not a mistake – it’s artistic license!)

*

*

Fold it up and tape the sides down.

Also put tape across the bottom edges for reinforcement.

You want it to be as strong as possible because the post office workers will be so fascinated with your envelope that they’ll handle it a lot.

*

*

Cut off any excessively long parts to the top flap.

This will be necessary if the initial paper was rectangular.

But nota bene: The final product need not be perfectly symmetrical. It is, after all, a unique handmade woik o’ aht.

*

*

It’s starting to really look like an envelope!

*

*

Final steps & Voila!

Fold over the top so the opening is entirely covered.

*

*

Here’s what it ends up looking like, front and back.

*

*

Congratulations!  You’ve just made an envelope!

*

Send Your Envelope

To address your envelope, you can do one of the following:

1) Use a Sharpie pen, glitter pen, or the like on a blank portion of your image. (Just be sure to pick something water resistant and extremely visible)

2) Glue or tape on a piece of white paper that’s been cut into an interesting shape to serve as an address label

3) Use one of those sticky tags for same purpose

Add your return address and a stamp.

Tape shut and send.

And await the joyful response from your correspondents who’ve gotten so used to e-mail only that they’ll be wowed by receiving this work of art, uniquely made just for them, in the post.

*

*

In case you’re wondering, I’ve sent hundreds of these over the years, some as SASEs to myself, and they’ve always arrived. One postal worker did warn me, though, that mail sent in such envelopes might take a day or two longer to arrive since they get passed around in the PO for everyone to ooh and aah over before sending them on.

Enjoy!

And please send me images of envelopes *you* make!

*

A version of this is a featured Instructable on the wonderful DIY website of the same name.  (Uh-oh, my secret identity, BrujaHa, is now revealed…)


Sometimes it’s the little things that count… January 29, 2010

Filed under: Arts,Humor — BrujaHa @ 9:43 pm
Tags: , , , , , , , , ,

It was bleak, it was rainy and totally grey;

The skies and my mood showed congruent decay.

But a dear loving friend pushed all that away:

A small vampire appeared in my mailbox today.


(Thanks, Ken & Ruth!)

When you next de-clutter your house, consider sending those mathoms on to bring your friends joy.